Shop and Enroll in Medicare Plans on the Website
Shopping and enrolling in a plan on the website is convenient and saves time. You can shop and enroll in plans any time during the Open Enrollment Period (OEP) or when you have a Special Enrollment Period (SEP). There's no need to schedule an appointment with a licensed benefit advisor. If you'd like to schedule an appointment, sign in and select Speak to an Expert from the Help and Support drop-down list. You can also call us at your convenience.
If you would like to review and enroll in a Medigap plan, see Shop and Enroll in a Medigap Plan on the Website.
To begin shopping for a Medicare Advantage or Prescription Drug plan, complete these steps:
1. Sign in to Via Benefits if you haven't done so already.
Note: Before you start shopping for a plan, go to your Profile and ensure your Personal Information is correct. Then select Return to Home.
2. Select Shop for Plans in the Shop & Compare section of the Home page.
3. Provide some required information:
Choose the Medicare-eligible person you're shopping for and verify your shopping ZIP Code.
Review your Reimbursement Funds Offered, if applicable.
If funds aren't being offered to you, this option won't appear.
Select Medicare Plans and the type of Medicare coverage you want.
Select why you're shopping.
If you indicate you're losing group coverage, had a life-changing event, or need to enroll outside of the Open Enrollment Period, select Choose an Enrollment Reason, and then select your enrollment reason from the list that appears. Select Save.
You can browse plans, but you must have an enrollment reason to apply for a plan.
Choose when you need coverage, then select Save and Continue.
Choosing an Enrollment Reason
Reviewing Funding Offered (if applicable)
You can review the following:
Qualification status
Qualified: You have met the requirements set by your former employer that allow you to receive funding. Your qualification requirements are shown inside the slide-out panel.
Not Yet Qualified: You have not met the requirements set by your former employer that allow you to receive funding. Your qualification requirements are shown inside the slide-out panel.
Qualification amount and frequency
Dual funded (if multiple funding accounts exist)
Premium reimbursements available per product
Funding source
4. After you select Save and Continue, enter the requested information to help us suggest plans that meet your needs (optional), and select Next.
Note: When reviewing your plan results, having entered this information will allow you to see which providers, prescriptions, and pharmacies are covered by the plans.
5. Review the plan results. Plan types are displayed on separate tabs.
If you're currently enrolled in a plan through Via Benefits, your current plan will appear first in the plan results. During the OEP, if you want to keep your current plan and it's being offered for the current year, you don't need to do anything, and your plan will automatically renew for the following year.
Note: You can't be enrolled in a Medicare Advantage Prescription Drug plan (MAPD) and a Prescription Drug plan (PDP) at the same time.
On the left side of the results page, you can:
A. View plan results based on Your Pharmacies when you have more than one pharmacy listed. Plan results will show estimated costs based on your chosen pharmacy.
B. Sort by Annual Estimated Plan Cost or Monthly Premium.
C. Filter by Insurance Carrier, Network Type, Drug Coverage, and Medicare Star Rating
Each plan tile shows you an overview of a plan, including:
D. View Plan Details shows detailed information about benefits, costs, and plan documents.
E. Network (e.g., HMO, LPPO)
F. Provider Coverage (Medicare Advantage only) and Drug Coverage (MAPD and PDP only). These rows show how many of your drugs and doctors the plan covers. Select the + icon to expand a row and see details.
G. Annual Maximum shows the maximum amount you will pay out of pocket.
H. Drug Copay
I. Annual Estimated Plan Cost and Drug Cost
J. Monthly Premium
K. Select Compare to view and compare up to three plans side-by-side.
6. Select Add to Cart to add a plan to your shopping cart. Alternatively, some plans have an Apply Now button instead of an Add to Cart button. When you select Apply Now, information displays detailing how to add that plan to your cart.
Note: When you select Add to Cart the button name changes to View Cart.
7. Select View Cart when you're ready to finalize your plan selections.
Note: You will see View Cart on the plan tile, the Shopping List, or when you click the cart icon.
8. Select Start Checkout at the bottom of the Shopping Cart pagewhen you're ready to apply.
9. Select Go to Application.
Applications that indicate Online can be completed entirely on the website. Applications that indicate Phone must be completed by calling and speaking with a Via Benefits representative.
Some applications may require you to go to the insurance carrier’s website to apply.
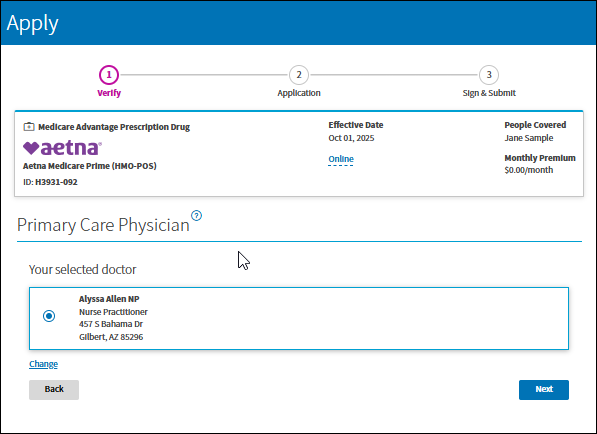
10. Select your Primary Care Physician and select Next.
11. Verify your information, select Next.
12. Provide the requested information on the Application.
Note: Only the first question is required.
13. Read the Disclaimer and select the box to agree to the terms and conditions, and select Next.
14. Sign the application and select Submit Application. You’ll get a message stating your application has been submitted.
15. Select Close to continue to your next application or view the status of your application.
Read Application and Policy Statuses to learn more.